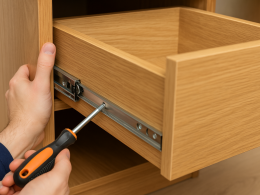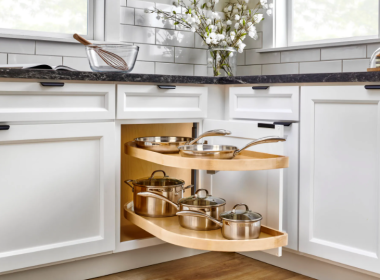

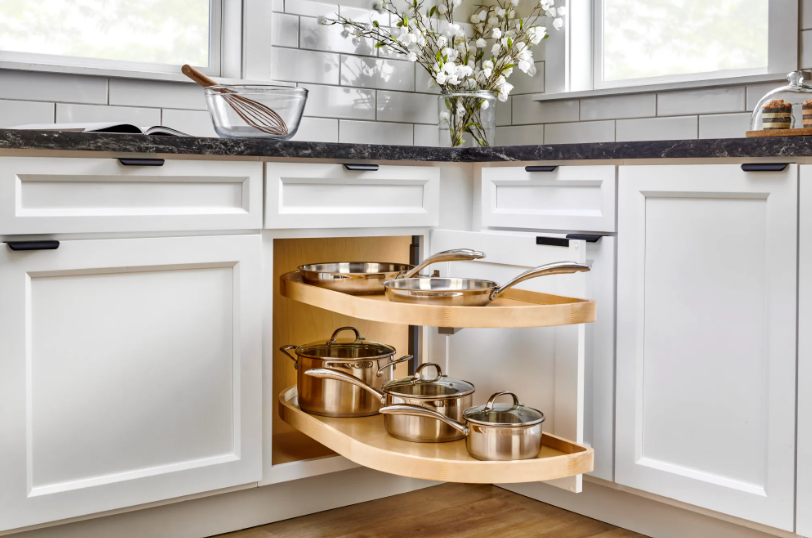
Installing a Rev-A-Shelf Girasolo blind corner cabinet organizer starts with one critical step: use the correct mounting template for your unit size, cabinet orientation, and cabinet construction.
From there, you install the center post and swing mechanisms, secure the top support, attach the shelf hubs, and lock the shelves into place.
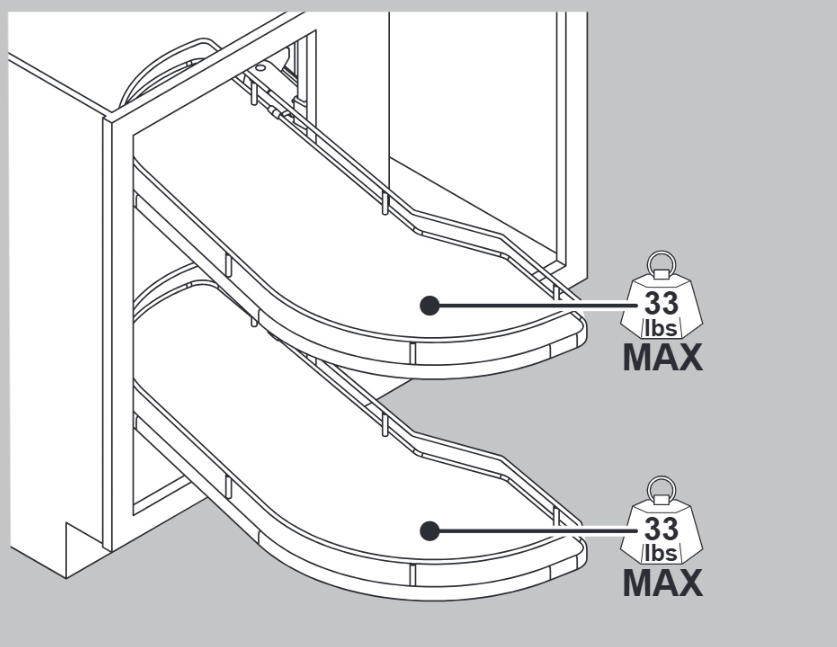
The Rev-A-Shelf instructions cover 12-inch, 15-inch, and 18-inch Girasolo units for both blind-left and blind-right cabinet configurations. They also show separate installation methods for face-frame and frameless cabinets. Each shelf has a maximum load rating of 33 pounds.
Quick Skim: Girasolo Installation
| Installation Detail | What to Know |
|---|---|
| Cabinet types | Face-frame and frameless blind corner cabinets |
| Unit sizes shown | 12-inch, 15-inch, and 18-inch |
| Cabinet orientation | Blind left or blind right |
| Maximum shelf load | 33 lbs. per shelf |
| Main mounting points | Cabinet floor, cabinet top, and center post |
| Face-frame installation | Uses the top post support bracket (L) |
| Frameless installation | Top post bracket (F) mounts directly to the cabinet top |
| Tools shown | Phillips screwdriver, marking tool, hammer, and tape measure |
| Important first step | Use the correct supplied template for your unit and cabinet layout |
Before You Install the Girasolo
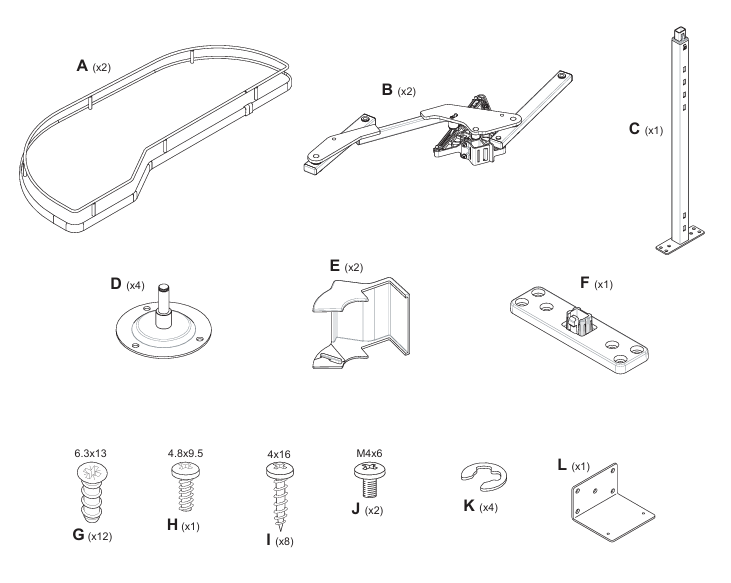
Review the parts and hardware before you start. The instructions show two shelf assemblies (A), two swing mechanisms (B), one vertical post (C), four shelf hubs (D), two covers (E), one top post bracket (F), four retaining clips (K), and one top post support bracket (L), along with the required mounting screws.
The installation method changes slightly depending on whether you have a face-frame or frameless cabinet.
For a face-frame cabinet, you will use the top post support bracket (L) with the top post bracket (F).
For a frameless cabinet, use the frameless template to help maintain clearance around the cabinet hinge and door. Rev-A-Shelf instructs you to skip the separate top post support bracket and mount the top post bracket directly to the cabinet top later in the installation.
Step 1: Mark the Top and Bottom Mounting Locations
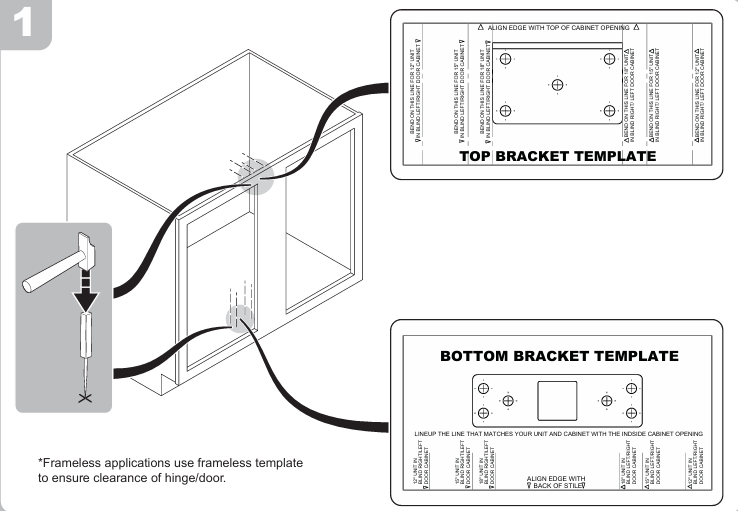
Start with the supplied mounting templates shown on page 2 of the instructions.
Choose the template line that matches:
- Your 12-inch, 15-inch, or 18-inch Girasolo unit
- A blind-left or blind-right cabinet
- A face-frame or frameless cabinet
For the bottom bracket template, align the specified edge with the back of the cabinet stile and match the correct unit line with the inside cabinet opening.
For the top bracket template, align the template with the top of the cabinet opening and bend it along the line that matches your unit size and cabinet orientation.
Use the marked template locations to transfer the mounting points to the cabinet. For frameless cabinets, use the dedicated frameless template specified by Rev-A-Shelf.
Step 2: Assemble the Top Support for a Face-Frame Cabinet
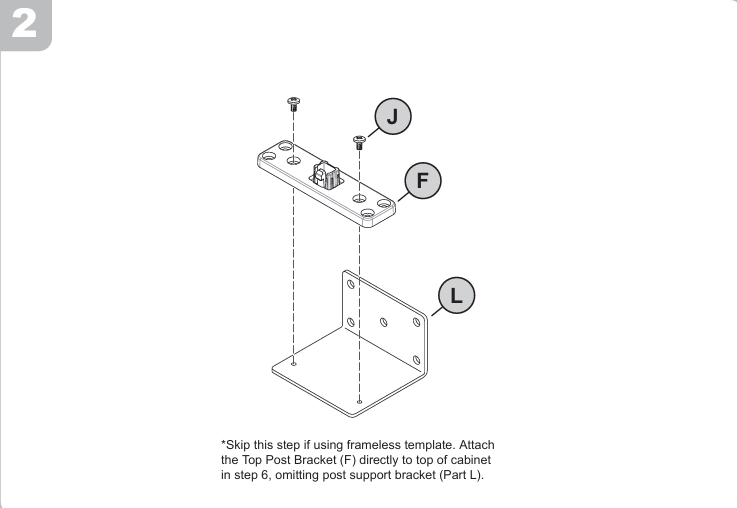
If you have a face-frame cabinet, attach the top post bracket (F) to the post support bracket (L) using the two M4x6 screws (J).
This creates the upper mounting assembly that will support the vertical post.
Installing in a frameless cabinet? Skip this step. Rev-A-Shelf directs you to mount bracket F directly to the top of the cabinet in Step 6.
Step 3: Install the Vertical Post
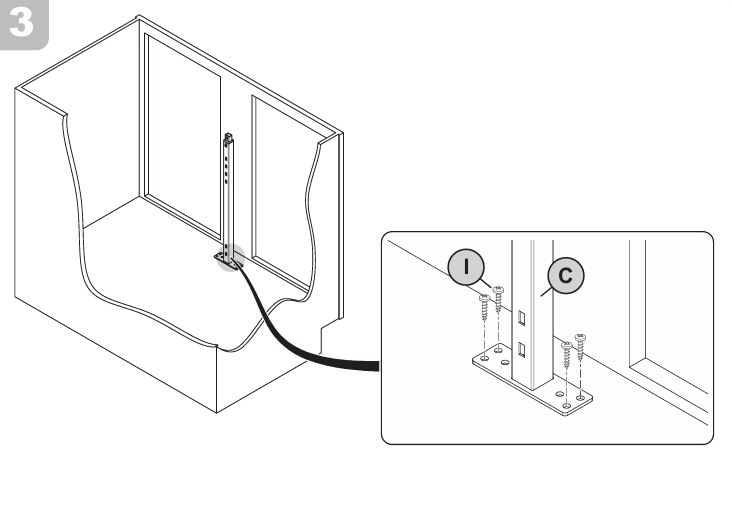
Place the vertical post (C) at the bottom mounting location you marked with the template.
Secure the post’s bottom mounting plate to the cabinet floor using the 4×16 screws (I), following the hole pattern shown on page 3 of the instructions.
Make sure the post remains aligned with the cabinet opening before moving on to the swing mechanisms.
Step 4: Install the Lower Swing Mechanism
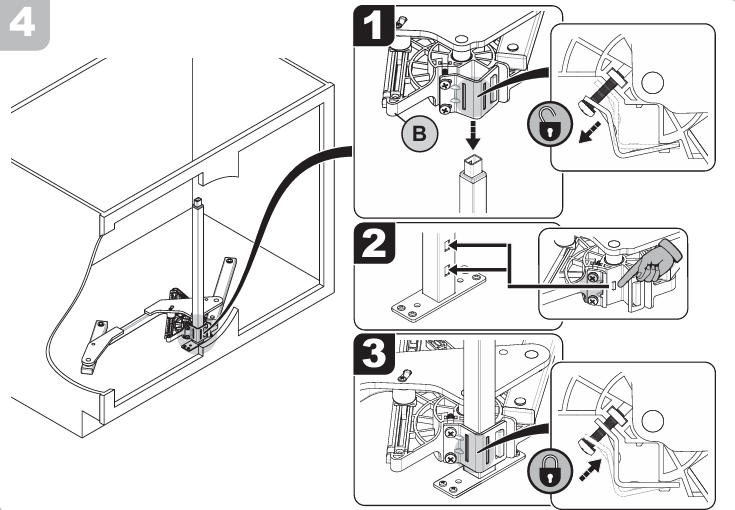
Take one swing mechanism (B) and release its locking clamp.
Slide the mechanism onto the vertical post (C), move it into the lower position shown in the installation diagram, and re-engage the lock.
The illustrations below show the lock in both its released and secured positions. Make sure the mechanism is locked onto the post before continuing.
Step 5: Install the Upper Swing Mechanism
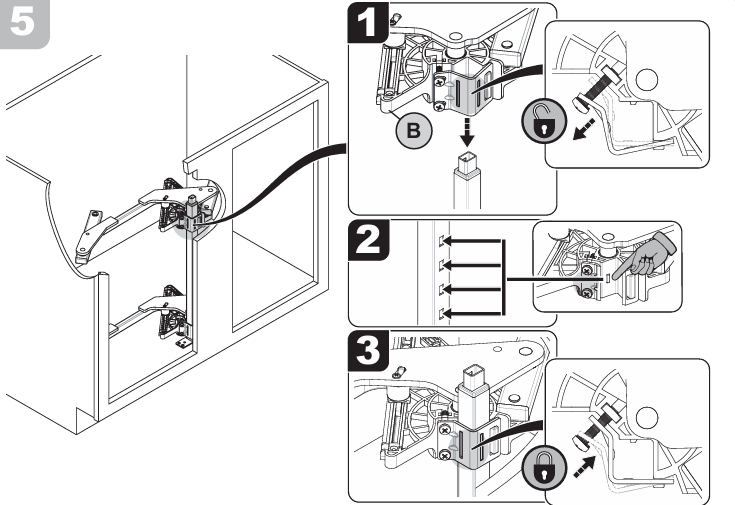
Repeat the same process with the second swing mechanism (B).
Release the locking clamp, slide the mechanism onto the upper portion of the vertical post, position it as shown, and lock it in place.
At this stage, both the upper and lower swing mechanisms should be mounted on the same center post.
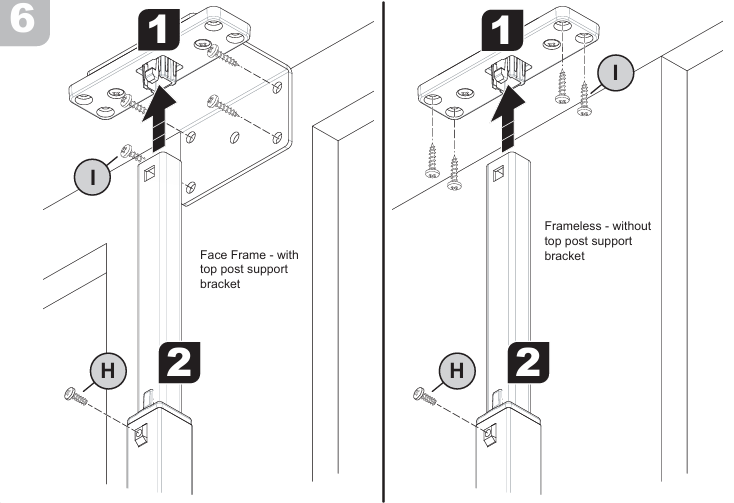
Step 6: Secure the Top of the Post
The next step depends on your cabinet construction.
Face-Frame Cabinet
Slide the face-frame top support assembly from Step 2 into position over the top of the post. Secure the support bracket to the cabinet using the 4×16 screws (I) at the mounting points shown in the instructions.
Then secure the post at the indicated locking point using the 4.8×9.5 screw (H).
Frameless Cabinet
Position the top post bracket (F) directly against the top of the cabinet and secure it with the 4×16 screws (I).
Then install screw (H) at the indicated post locking point.
See below for side-by-side diagrams for the face-frame and frameless mounting methods.
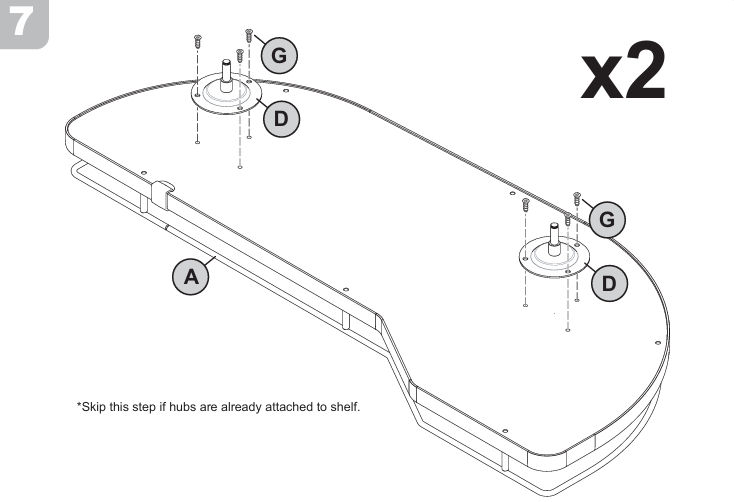
Step 7: Attach the Shelf Hubs
Turn to the shelf assemblies (A).
Each shelf uses two hubs (D), for a total of four hubs. Attach each hub using the 6.3×13 screws (G) in the locations shown on page 5.
Repeat the process for both shelves.
Rev-A-Shelf notes that you can skip this step if the hubs are already attached to your shelves.
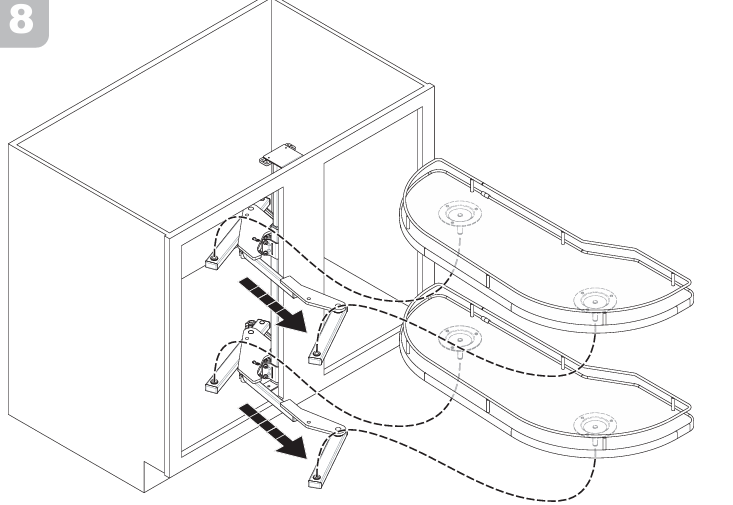
Step 8: Mount the Shelves to the Swing Mechanisms
Extend the upper and lower swing mechanisms through the cabinet opening, as illustrated on page 5.
Position each shelf over its corresponding mechanism and seat the shelf at both hub locations. Check that all four hub connections are properly positioned before securing them.
Working with the mechanisms extended gives you easier access to the underside of each shelf.
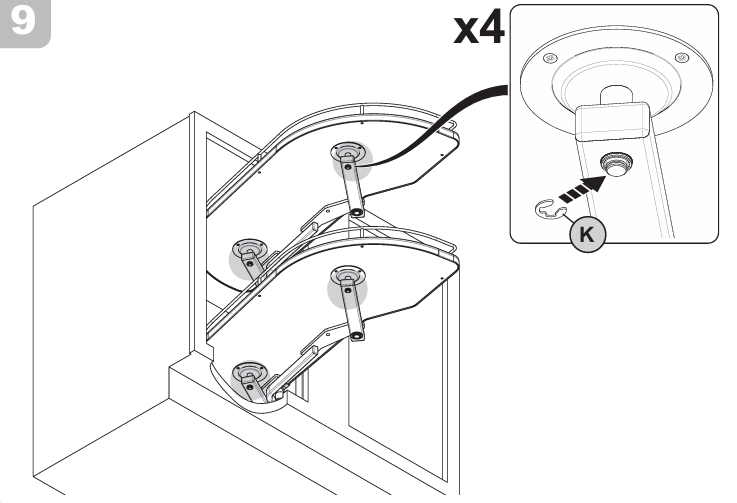
Step 9: Install the Retaining Clips
Once the shelves are seated, install the four retaining clips (K).
The diagram below shows one clip securing each hub connection underneath the shelves. Verify that all four clips are fully engaged before operating the organizer.
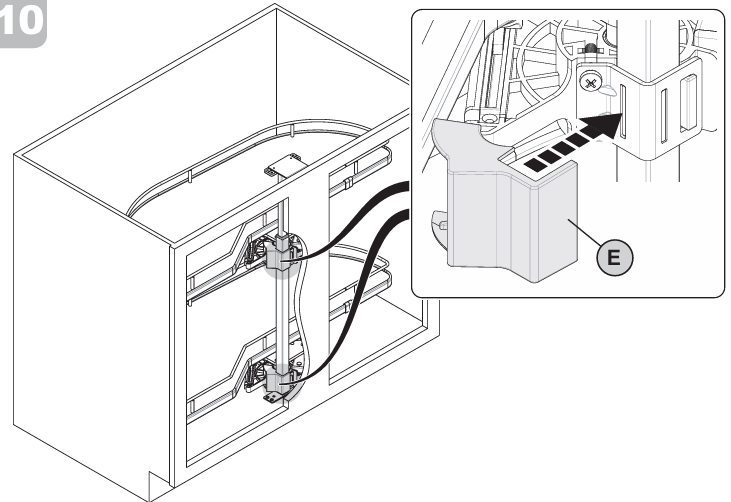
Step 10: Install the Mechanism Covers
Finish the installation by sliding the two covers (E) into place over the exposed portions of the swing mechanisms.
The completed assembly should now have both shelves mounted, both mechanisms secured to the center post, and the upper and lower post connections fastened to the cabinet.
Check the Organizer Before Loading It
After installation, move each shelf through its full swing-out motion. Check that the organizer clears the cabinet opening and surrounding hardware and that all brackets, locks, clips, and shelf connections remain secure.
Pay particular attention to hinge and door clearance on frameless cabinets. The Rev-A-Shelf instructions specifically call for the frameless template to help provide this clearance.
Finally, keep the weight on each shelf within the manufacturer’s 33-pound maximum load rating.
Final Takeaway: How to Install Rev-A-Shelf Girasolo Blind Corner Cabinet Organizer
The easiest way to get a Rev-A-Shelf Girasolo installation right is to spend extra time on the template and mounting locations. Match the template to your unit size, blind-corner orientation, and cabinet type before drilling or fastening anything.
Once the center post is correctly positioned, the rest of the installation follows a clear sequence: mount the two swing mechanisms, secure the upper post, attach the shelf hubs, install the shelves, and lock everything in place.