



Conversion varnish is a durable, chemically cured wood finish built for high-use cabinets and interior millwork. It resists moisture, household chemicals, and daily wear, making it a strong choice for kitchen cabinets, bathroom vanities, and commercial interiors.
But a good conversion varnish finish starts with the right specifications, not just the right spray technique. Shops must match the coating to the substrate, measure the catalyst, control film thickness, and follow the correct drying and curing conditions.
This guide covers how to choose, specify, and apply conversion varnish while reducing finish defects, material waste, and costly rework.
Quick Skim: Conversion Varnish Specifications
| Decision factor | What cabinet shops need to know |
|---|---|
| Best applications | Kitchen cabinets, bathroom vanities, furniture, and interior millwork |
| Finish type | Usually a two-component, post-catalyzed coating that cures through a chemical reaction |
| Main benefits | Strong resistance to moisture, common household chemicals, marring, and daily wear |
| Catalyst and pot life | Product-specific. Some systems offer 8 hours; others offer 24 hours |
| Film thickness | Follow the coating’s wet film target and maximum total dry film build |
| Application | Professional spray equipment, approved booth ventilation, and controlled conditions |
| Temperature and humidity | Follow the product data sheet. Some systems require at least 64°F and no more than 65% relative humidity during application and cure |
| Biggest risks | Wrong catalyst ratio, excess film build, poor adhesion, cold curing conditions, and incompatible sealers |
| Best buying approach | Select the complete coating system, then compare pot life, VOC compliance, sheen, film build, and production timing |
Bottom line: Conversion varnish works best when shops treat it as a complete finishing system. The topcoat, catalyst, sealer, application method, and curing conditions must work together.
What Is Conversion Varnish, and How Does It Work?
Conversion varnish is a professional wood coating that uses a chemical catalyst to create a hard, protective film.
Most traditional conversion varnishes use an acid-catalyzed resin system. The finisher adds the approved catalyst before spraying. As the coating dries, a chemical reaction called cross-linking helps form a durable film.
This is different from a standard nitrocellulose lacquer, which forms its film mainly as solvents evaporate. Pre-catalyzed lacquers can also cross-link, but they use different systems and generally offer a different balance of durability, handling, and repair.
The resulting conversion varnish film can offer strong resistance to:
- Water and moisture exposure
- Common kitchen spills and household chemicals
- Surface marring and everyday abrasion
- Heat and routine cabinet use
Performance depends on the specific coating and how well the shop applies it.
One key difference matters during repair: Conversion varnish does not re-dissolve and blend into an older cured coat the way many traditional lacquers do. Shops must follow the specified sanding and recoat process to maintain adhesion.
Conversion varnish also does not always need an oven. Many industrial systems cure under controlled shop conditions. Heat can speed some approved finishing schedules, but it is not a universal requirement.

Conversion Varnish vs. Lacquer vs. Polyurethane
Each finish offers a different mix of durability, workflow, and repair needs. The right choice depends on the job and the shop’s equipment.
| Finish | Key advantage | Main limitation | Best use |
|---|---|---|---|
| Conversion varnish | Strong chemical, moisture, and wear resistance | Catalyst control, film limits, and harder repairs | High-use cabinets and commercial millwork |
| Pre-catalyzed lacquer | Fast production and familiar spray workflow | Performance varies; often less chemical resistant than high-performance CV | General interior cabinets and furniture |
| Two-component polyurethane | Can offer high chemical and abrasion resistance | More complex handling, safety, and mixing needs | Demanding interior finishes and specialty work |
| Industrial waterborne coating | Can reduce solvent emissions and odor | Requires product-specific airflow, cure, and performance checks | Shops with VOC goals or waterborne production lines |
No single finish wins every job.
Choose conversion varnish when lasting surface performance is the main goal. Consider other coating systems when easier touch-ups, field finishing, specific regulatory needs, or existing shop equipment drive the decision.
When Should a Cabinet Shop Specify Conversion Varnish?
Conversion varnish is a strong option for work that must look good and stand up to routine use.
Kitchen Cabinets
Kitchen doors and drawer fronts face oils, food spills, moisture, and frequent cleaning. Conversion varnish helps protect these surfaces while offering a smooth, professional appearance.
Clear systems work well on natural wood cabinets. Pigmented systems give shops solid colors without giving up the benefits of a high-performance finish.

Bathroom Vanities
Vanities face splashes, cleaning products, and changes in humidity.
Conversion varnish offers moisture resistance, but it is not waterproof. Shops still need to seal exposed edges, protect joints, and use moisture-resistant construction methods suited to the project.
Commercial Millwork
Office cabinetry, retail fixtures, and other interior millwork can face heavy daily use.
For these projects, a finish system with documented chemical and moisture resistance can help shops meet performance requirements and reduce future service calls.

When Another Finish Makes More Sense
Conversion varnish may not be the right choice for every project. Consider another coating when the work requires exterior weather exposure, frequent field repairs, or brush application.
Most conventional conversion varnishes are made for interior shop spraying. Always confirm the product’s approved uses before specifying it for unusual conditions.
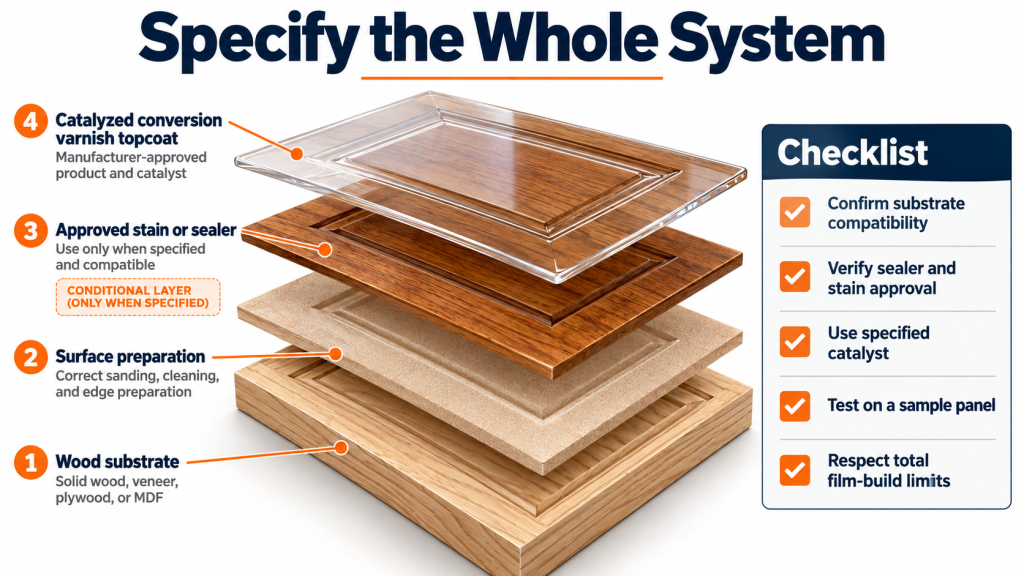
How to Specify Conversion Varnish for Cabinet Production
A finish specification should tell the shop exactly what to use, how to apply it, and how to judge the result.
Before approving a coating system, confirm these six factors.
1. Match the Coating to the Substrate
Solid wood, veneer, plywood, and MDF do not all finish the same way.
Open-grain wood may need added pore filling or a suitable sealer. MDF edges often need extra preparation to prevent uneven absorption. Veneer needs controlled sanding to avoid cutting through the face.
Check the manufacturer’s approved substrates and preparation steps before starting production.
2. Choose Clear or Pigmented Conversion Varnish
Use clear conversion varnish when the job calls for visible wood grain. Choose the sheen and color stability that match the design.
Use pigmented conversion varnish for solid-color cabinetry. Check hiding power, primer compatibility, edge coverage, and the approved film build.
A pigmented finish and a clear finish may have different solids content, sanding times, and total system thickness limits, even within the same product family.
3. Specify the Complete Sealer and Topcoat System
Do not assume any sanding sealer will work under conversion varnish.
Acid-catalyzed systems may react poorly with certain stains, sealers, or existing finishes. This can lead to discoloration, poor adhesion, or finish defects.
Choose a manufacturer-approved sealer or a topcoat that is rated for self-sealing. Confirm stain compatibility and test the full system on a sample panel.
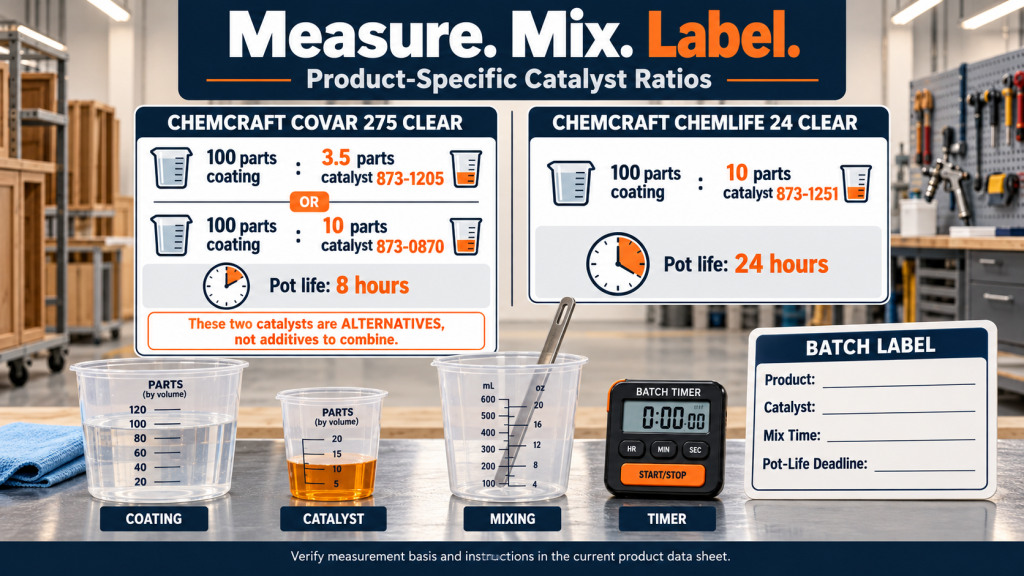
4. Set the Catalyst Ratio and Pot Life
The catalyst ratio is a technical requirement, not an adjustment the operator should make by feel.
Too little catalyst can slow or prevent a full cure. Too much can make the coating brittle and increase the risk of cracking.
Use the catalyst listed in the current product data sheet. Measure it with the specified method, mix it fully, and label each batch with its start time.
Pot life also affects cost. A short pot life can lead to more waste if a shop mixes more material than it can spray.
5. Define Wet and Dry Film Thickness
Film thickness is one of the most important factors in conversion varnish performance.
A heavy coat may look smooth at first, but excess build can lead to cracking or checking as the film cures or the wood moves.
Your specification should identify the wet film thickness per coat and the maximum dry film thickness for the complete system, including any sealer or primer.
6. Confirm Environmental and Performance Requirements
Check the product’s minimum substrate temperature, shop temperature, humidity limits, recoat window, dry-to-stack time, and full-cure guidance.
For production work, confirm any required finish tests as well. Some conversion varnish systems are marketed as meeting Kitchen Cabinet Manufacturers Association (KCMA) finish performance requirements.
A coating that meets KCMA finish test requirements does not, by itself, make a completed cabinet KCMA-certified. Cabinet certification covers more than the finish.
Choosing a Conversion Varnish: Two Chemcraft Systems
Würth Louis & Company offers conversion varnish systems for different production needs.
Two Chemcraft clear-coat systems show why cabinet shops should compare actual specifications instead of treating all conversion varnishes alike.
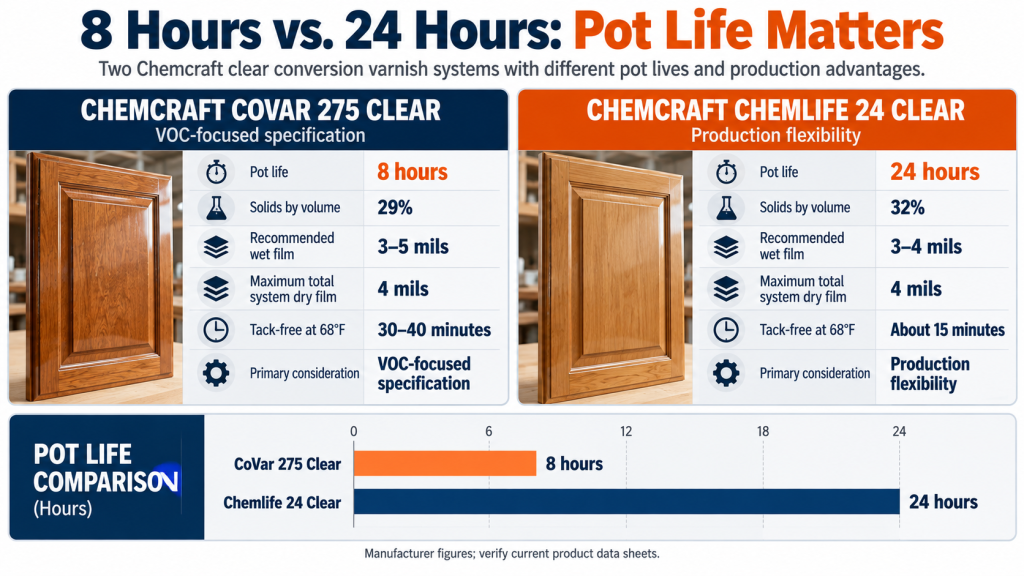
| Specification | Chemcraft CoVar 275 Clear | Chemcraft Chemlife 24 Clear |
|---|---|---|
| Main buying consideration | VOC-focused specification and fast-drying performance | Longer pot life and production flexibility |
| Pot life | 8 hours | 24 hours |
| Recommended wet film | 3 to 5 mils | 3 to 4 mils |
| Solids by volume, as supplied | 29% | 32% |
| Maximum total system film build | 4 mils dry | 4 mils dry |
| Tack-free time at 68°F | 30 to 40 minutes | About 15 minutes |
| Dry to sand at 68°F | 60 to 90 minutes | About 1 hour |
| Dry to stack | Overnight | Overnight |
Figures are from the manufacturer’s U.S. product information sheets. Actual drying and handling times depend on film build and shop conditions. Confirm the current sheet for the exact product before use.
Chemcraft CoVar 275: For VOC-Focused Projects
Chemcraft CoVar 275 Conversion Varnish is a two-component, post-catalyzed coating formulated for 275 g/L VOC regulatory requirements.
It offers chemical and wear resistance, quick drying, and a smooth finish on interior woodwork.
Its eight-hour pot life makes batch planning important. Shops should mix only what they expect to spray within that time.
Chemcraft Chemlife 24: For Flexible Production Scheduling
Chemcraft Chemlife 24 Conversion Varnish offers a 24-hour catalyzed pot life, strong chemical resistance, and good vertical hang.
The longer working window can help reduce waste when production runs change or crews spray several batches.
It does not remove the need to control film thickness, catalyst levels, or drying conditions.
Shop tip: Compare solids by volume, not just the solids figure shown on a product listing. Solids by weight and solids by volume are different values, and only the latter belongs in basic wet-to-dry film calculations.
Wet Film vs. Dry Film: A Simple Shop Calculation
Wet film thickness (WFT) is the thickness of the coating right after application. Dry film thickness (DFT) is what remains after the coating loses its volatile components and forms a film.
One mil equals 0.001 inch.
A basic planning formula is:
Estimated dry film = Wet film × Solids by volume
For example, suppose a coating has 32% solids by volume and the shop applies a 3.5-mil wet coat.
3.5 × 0.32 = approximately 1.12 mils dry.
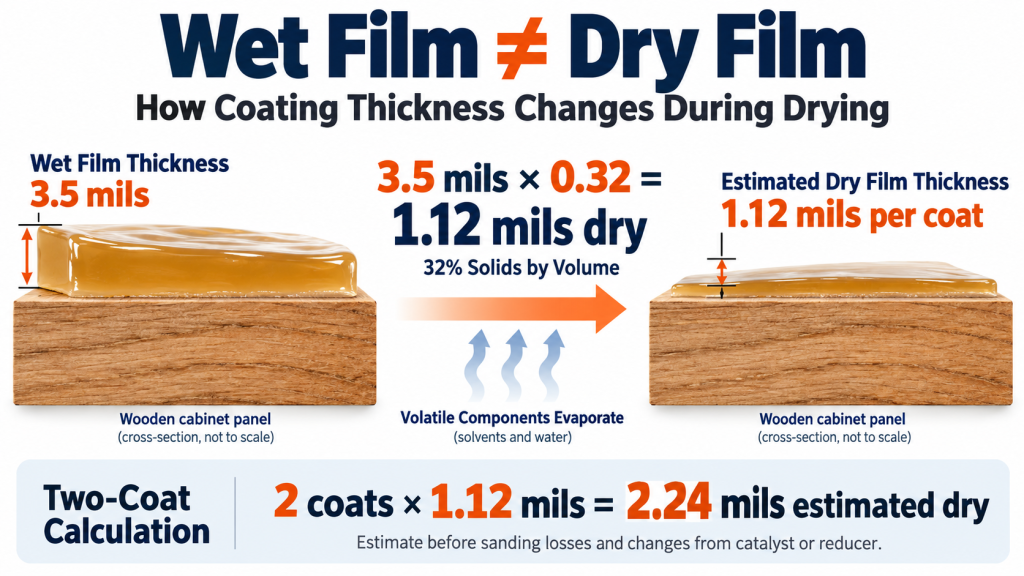
Two such coats would produce an estimated 2.24 mils dry before accounting for sanding losses or changes caused by the catalyst and reducer.
This is a planning estimate, not a final film measurement. Shops must account for the solids of the material as mixed and follow the manufacturer’s total system limit.
Why it matters: A specification that calls for 4 mils wet is not the same as one that calls for 4 mils dry. Confusing the two can lead to overbuilding the finish.
Use a wet film gauge during setup and production to help control coat thickness.
How to Apply Conversion Varnish in a Cabinet Shop
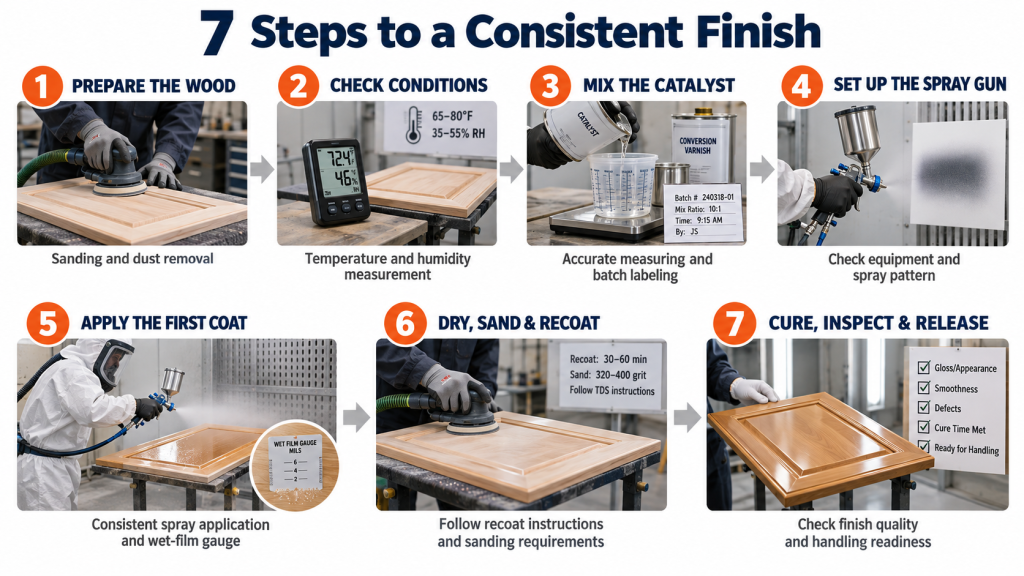
Use the manufacturer’s technical data sheet as the main process guide. The steps below provide a practical production workflow.
Step 1: Prepare the Wood
Sand the wood to the required grit and remove all sanding dust. Keep oil, wax, silicone, and other contaminants off the surface.
For example, Chemcraft lists 120, 150, or 180 grit preparation options for CoVar 275 clear, depending on the finishing stage.
Check edges, profiles, and MDF faces for uneven absorption before the first coat.
Step 2: Confirm Shop Conditions
Measure temperature and relative humidity before mixing.
Chemcraft CoVar 275 clear and Chemlife 24 clear both specify a minimum curing temperature of 64°F and a maximum relative humidity of 65%.
The actual wood temperature also matters. Cold doors moved into a warm spray booth may still be too cold for the finish schedule.
Step 3: Mix the Catalyst Accurately
Stir the finish as directed, then add the approved catalyst at the specified ratio while mixing.
For example, Chemcraft’s technical information lists the following ratios for the clear topcoats:
- CoVar 275: 100 parts coating to 3.5 parts catalyst 873-1205, or 100 parts coating to 10 parts catalyst 873-0870.
- Chemlife 24: 100 parts coating to 10 parts catalyst 873-1251.
These are product-specific ratios, not universal conversion varnish formulas. Follow the manufacturer’s stated measurement basis and procedure.
Record the product, catalyst, batch size, and mixing time. Do not extend the listed pot life because unused material still looks sprayable.
Step 4: Set Up the Spray Equipment
Use a spray system approved for the coating and its cleanup solvents.
HVLP, conventional, air-assisted airless, and other professional systems may be suitable, depending on the product and equipment.
Check gun and hose compatibility, air supply, viscosity, fluid delivery, and spray pattern. Use only an approved reducer, within the manufacturer’s limits.
Spray a test panel before starting the full job. Adjust equipment settings to reach the approved film thickness without runs or dry spray.
Step 5: Spray the First Coat
Apply a consistent wet film within the approved range.
Use steady gun travel, suitable overlap, and controlled distance from the surface. Watch for excess coating along door edges, corners, and routed profiles.
Measure wet film thickness on a representative test surface. Do not rely only on appearance.
Step 6: Dry, Sand, and Recoat
Allow the finish to reach the specified sanding stage.
Sand with the grit listed in the manufacturer’s instructions, remove sanding residue, and apply the next coat within the approved recoat window.
For CoVar 275 clear, Chemcraft calls for sanding between coats with 280/320 grit stearated paper and recoating within the specified time after sanding.
Do not assume a new coat will melt into an older cured conversion varnish film. Proper surface preparation is important for adhesion.
Step 7: Cure, Inspect, and Release
Keep the finished parts in the required curing environment.
Check gloss, color, adhesion, surface defects, and film build as part of the shop’s quality control process.
Follow the specified dry-to-stack and handling times. Tack-free, dry-to-sand, dry-to-stack, and full cure are different stages.
A door that can be stacked may still need more time to develop its final chemical resistance. Confirm the approved pack-out and service schedule before shipping or installation.
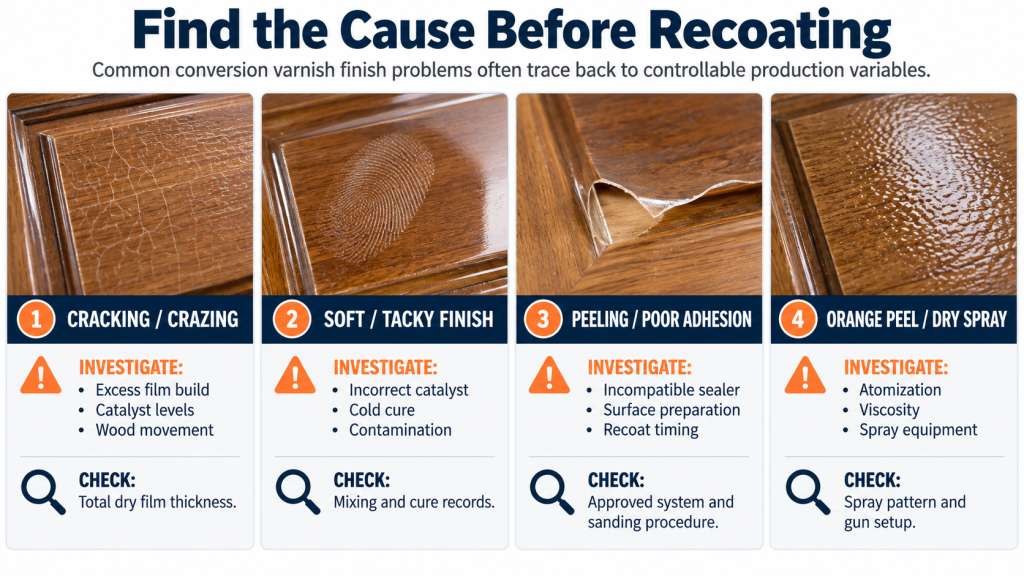
Common Conversion Varnish Problems and How to Prevent Them
Most avoidable production defects come from errors in preparation, mixing, application, or environmental control.
| Problem | Likely causes to investigate | What to check |
|---|---|---|
| Cracking or crazing | Excess dry film build, brittle film, wrong catalyst level, or wood movement | Total DFT, catalyst records, and product limits |
| Soft or tacky coating | Wrong catalyst ratio, cold cure, contamination, or material past pot life | Batch records, temperature, and cure schedule |
| Peeling or poor adhesion | Incompatible sealer, surface contamination, poor sanding, or missed recoat window | Approved system, surface prep, and recoat records |
| Orange peel or dry spray | Poor atomization, viscosity, gun setup, or airflow | Spray pattern, material viscosity, and equipment settings |
| Cloudy or discolored finish | Moisture, incompatible materials, contamination, or chemical exposure | Humidity, substrate conditions, sealer, and cleaning agents |
| Uneven sheen | Poor mixing, uneven film build, or inconsistent spray conditions | Agitation, film thickness, and spray technique |
Do not assume a finish defect needs only another coat.
First identify the cause. Adding more finish over a failing coating can make the repair harder and push the system beyond its maximum film build.
For recurring defects, keep a sample from the failed batch and review it with the coating manufacturer or technical representative.
Conversion Varnish Safety: What Shops Must Control
Conversion varnish is intended for controlled professional finishing operations.
Acid-catalyzed products may contain or release formaldehyde, and solvent-based systems can present inhalation and fire hazards. Low-VOC claims do not mean a product is free of health risks.
Shops should use approved spray facilities, suitable mechanical ventilation, and fire protection. Select respiratory protection based on the product’s safety data sheet, workplace exposure assessment, and applicable OSHA rules.
An air-purifying respirator is not automatically suitable for every product or exposure. Some operations require supplied-air respiratory protection. Shops must establish the correct protection through their respiratory safety program.
Review OSHA’s spray finishing requirements, respiratory protection requirements, and applicable formaldehyde exposure requirements.
Never substitute a plastic-sheet enclosure and a household fan for a properly designed spray finishing area.
How to Reduce Conversion Varnish Waste and Rework
A coating with a lower price per gallon does not always cost less per finished cabinet.
Compare how each system affects the full job:
| Cost factor | Shop action |
|---|---|
| Unused catalyzed material | Mix smaller batches and match pot life to the production schedule |
| Excess finish use | Measure WFT and control overlap and transfer efficiency |
| Rework | Test adhesion, sheen, and finish compatibility before production |
| Handling delays | Plan sanding, stacking, and shipping around actual dry times |
| Material purchasing | Order compatible topcoats, sealers, catalysts, and reducers together |
For recurring jobs, track coating used per finished door or square foot, plus the amount discarded after each batch. This gives the shop a better view of actual finishing cost than container price alone.
Final Takeaway: Specify the System, Then Control the Process
Conversion varnish is a strong choice for cabinet shops that need a durable, professional finish on high-use interior woodwork.
The best results come from choosing the right product, using its approved catalyst and sealer, measuring film thickness, and maintaining the required curing conditions.
Explore conversion varnishes and finishing supplies at Würth Louis & Company to compare systems for your shop. Review the latest product data sheets and work with your Würth Louis & Company representative to match the finish to your application and production needs.